学习 Spring Boot - 1
声明:本文为 ryanluoxu 原创文章,欢迎转载,请在明显位置注明出处。
学习 Spring Boot 有一段时间,也看过很多人的教程,中途放弃了几次,又重新开始。
需要很不负责地说,有些教程确实因为时间的关系,已经不适合用来学习参考了。
这篇博客包括以下内容:
- 项目初始化
- Maven 的作用
- 内置 TomCat
- 运行项目,创建简单的 info 页面
- 添加如下 Web Service
- GET 获得全部用户信息
- GET 获得某个用户信息
- POST 添加一个用户
- PUT 更新某个用户
- DELETE 删除某个用户
项目初始化
Spring Boot 常用的初始方式有三种:
- Spring Initializer
- Spring Boot CLI
- Spring Tool Suite
后两者需要额外安装,我比较推荐使用 Spring Initializer 初始化之后,再导入到 Eclipse 中。
初始化操作
- Go to https://start.spring.io/
- 如图填写,在
Search for dependencies下面填web之后选择,我们需要用到这个 Dependency。
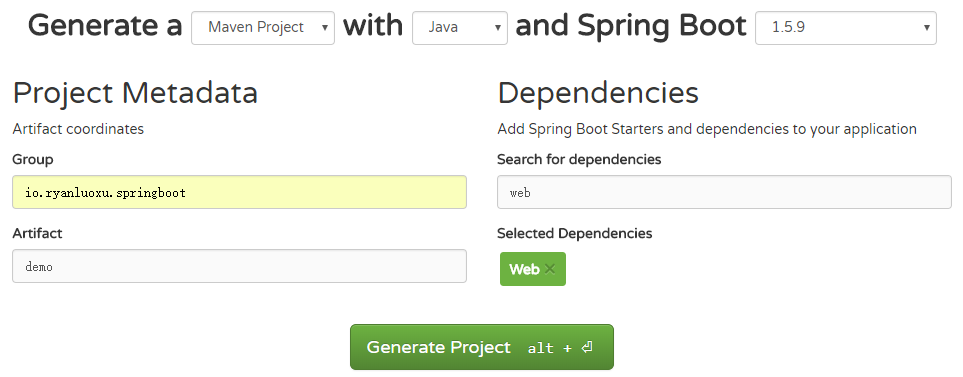
- 点击
Generate Project,生成并且下载。 解压后放在 Eclipse 的 workspace 文件夹下面。 - 打开
Eclipse, 右键-Import..-Existing Maven Projects - 选择刚才解压的项目文件夹。例如:D:\workspace\SpringBootDemo
Projects窗口中会出现pom.xml,完成。
可能碰到的问题:
- 这里可能会出现
Project build error,到 pom.xml 里面,把 Parent 的版本改成 1.5.8 即可。 估计 1.5.9 以及以上的版本和我的 Maven 不合吧。 Configuration is not up-to-date: 右键项目-Maven-Update Project。
效果如下: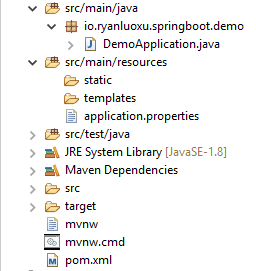
Maven 的作用
在我的理解中,Maven 主要的作用就是帮助管理 library。 作为一个框架,Spring 会用到很多其他的库,这些库也有自己的版本以及各种更新。 Maven 可以帮助节约大量的操作。
比如spring-boot-starter-web, 用到几十个库,自己下载再添加,费时且可能出错。
而在 Maven 的 pom.xml 文件中,输入下面这段代码:
1 | <dependencies> |
保存后,系统会自动添加 Maven Dependencies,里面会有所有相关的库。
之后只需在 pom.xml 中修改,保存之后,系统会自动完成更新。
内置的 TomCat
这是一个困扰我很长一段时间的问题,程序开始工作,向外发布信息,需要在一个 Server 上运作。 所以一般的 Web Project,我们都会添加 TomCat 作为服务器,程序运行在 TomCat 上面。
但是对于 Spring Boot 来说,就不需要了,在这里,其实它只是一个普通的 Java Project。 只是内置了 TomCat,可以在Maven Dependencies中找到tomcat-embed-core-8.5.23.jar等库,说明事实上程序运行依然是通过 TomCat 完成,内置的好处就是…有太多好处了。
所以只需要按照普通的 Java 程序来运行即可。
运行项目,创建简单的 info 页面
运行项目
打开 DemoApplication.java,如下代码已经自动生成:
1 | import org.springframework.boot.SpringApplication; |
直接按照普通的程序运行即可。
Console 里面会得到 Spring 图标,以及几个关键提示:
- Initializing Spring embedded WebApplicationContext
- Tomcat started on port(s): 8080 (http)
- Started DemoApplication in 1.509 seconds
这样,程序已经开始在 TomCat 上运行了。
打开 http://localhost:8080/ 会得到 Whitelabel Error Page,因为我们还没有创建任何内容。
下面我们添加一个 Controller,来显示一些内容。
添加 info 页面
- 添加 package:
io.ryanluoxu.springboot.demo.controller - 在此 package 下面创建 InfoController.java, 如下: 这样,事实上已经创建了一个简单的 web service。
1
2
3
4
5
6
7
8
9
10
11
12
13import org.springframework.web.bind.annotation.RequestMapping;
import org.springframework.web.bind.annotation.RestController;
@RestController
public class InfoController {
@RequestMapping("/info")
public String showInfo() {
String info = "This is a Spring Boot Starter Project by RyanLuoXu..";
return info;
}
}
运行程序,前往 http://localhost:8080/info 即可看到 info 的内容。
这里我们只是返回了一个字符串,下面我们以 JSON 格式返回更多的信息。
添加 moreinfo 页面
- 添加 package: io.ryanluoxu.springboot.demo.model
- 在此 package下面创建 Info.java,如下:
1
2
3
4
5
6
7
8
9
10
11public class Info {
private String description;
private String startDate;
private String author;
private String framework;
private String database;
...setters and getters...
} - 在 InfoController.java 中添加:
1
2
3
4
5
6
7
8
9
10
11
12@RequestMapping("/moreinfo")
public Info showMoreInfo() {
Info info = new Info();
info.setAuthor("RyanLuoXu");
info.setDatabase("PostgreSQL");
info.setDescription("This is a Spring Boot Starter Project");
info.setFramework("Spring Boot");
info.setStartDate("2017-12-23");
return info;
}- 创建 info 为一个类
- 然后在 showMoreInfo() 里面定义它的内容,并且返回含有多个信息的 info 对象
- info 会被自动转成 JSON 格式
运行程序,前往 http://localhost:8080/moreinfo 即可看到 info 的内容。 如下:
{
“description”: “This is a Spring Boot Starter Project”,
“startDate”: “2017-12-23”,
“author”: “RyanLuoXu”,
“framework”: “Spring Boot”,
“database”: “PostgreSQL”
}
这里为了方便,我们把信息直接放在了 Controller 里面,事实上 Controller 是通过调用 Service 里的方法得到信息的。
下面的例子会把这部分分离开来,并且创建几个常用的 web service。
添加 Web Service : GET, POST, PUT & DELETE
这部分,我们新添加一个 User 类,实现对 user 信息的获取,更新,修改和删除。
GET 获得全部
- 在 io.ryanluoxu.springboot.demo.model 下面,创建 User.java, 如下:
1
2
3
4
5
6
7
8public class User {
private String userName;
private int age;
private String nationality;
...setters and getters...
} - 添加 package: io.ryanluoxu.springboot.demo.service
- 在此 package 下面,创建 UserService.java, 如下:
1
2
3
4
5
6
7
8
9
10
11
12
13
14
15
16
17
18
19
20
21
22
23
24
25
26
27
28
29
30
31@Service
public class UserService {
ArrayList<User> userList = new ArrayList<>();
public UserService() {
// create fake database here
User user1 = new User();
user1.setUserName("Melvin");
user1.setAge(30);
user1.setNationality("Singaporean");
User user2 = new User();
user2.setUserName("Ryan");
user2.setAge(36);
user2.setNationality("American");
User user3 = new User();
user3.setUserName("Hazel");
user3.setAge(26);
user3.setNationality("Chinese");
userList.add(user1);
userList.add(user2);
userList.add(user3);
}
}
// 一旦获取 UserService 类的对象,该对象中自带以上虚拟的信息
// 后续可以连接数据库,用 DAO 来获取数据 - 在 UserService.java 里,添加 getUserList():
1
2
3public ArrayList<User> getUserList(){
return userList;
} - 在 io.ryanluoxu.springboot.demo.controller 下面,创建 UserController.java:
1
2
3
4
5
6
7
8
9
10
11
12@RestController
public class UserController {
@Autowired
private UserService userService; // get one time instance
@RequestMapping("/users") // default method = SET
public ArrayList<User> getUserList(){
ArrayList<User> userList = userService.getUserList();
return userList;
}
}- 这里获取了一个 userService 对象。
- 事实上是 Spring 巡视项目,根据
@RestController和@Service创建了 userController 和 userService - 然后根据
@Autowired将 userService 注入到 userController 中,所谓的依赖注入。 - 当 ~/users 的 web service 被翻牌的时候,getUserList() 运行,通过 userService.getUserList() 得到信息,返回给呼叫该服务的前端。
- 运行程序, 前往 http://localhost:8080/users 得到:
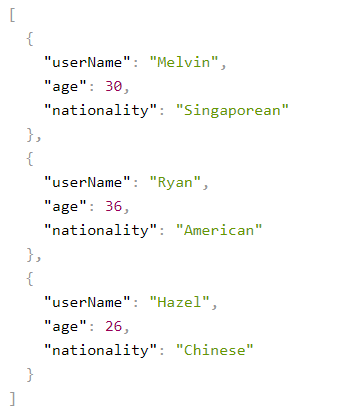
这里通过 URL,得到所有用户信息,下面获取特定某个人的信息。
GET 获得特定某个
- 在 UserService.java, 添加:
1
2
3
4public User getUserByName(String name) {
User user = userList.stream().filter(u -> u.getUserName().equals(name)).findFirst().get();
return user;
} - 在 UserController.java, 添加:
1
2
3
4
5
6@RequestMapping("/users/{name}")
public User getUserByName(@PathVariable String name) {
User user = userService.getUserByName(name);
return user;
}
// link {name} to name; {name1} X@RequestMapping("/users/{name}")@PathVariable String name
- controller 根据前端过来的 name 参数,呼叫 userService。
- userService 在用户列表里找到符合条件的信息,返回给 controller。
- controller 再以 JSON 格式返回给前端
- 运行程序, 前往 http://localhost:8080/users/Melvin, 得到:
{
“userName”: “Melvin”,
“age”: 30,
“nationality”: “Singaporean”
}
对于 GET 来说,都是获取信息,当 URL 直接在浏览器上输入时,都是默认 GET 方法。
下面的添加,更新和删除需要借助额外的工具:PostMan。
POST 添加
- 在 UserService.java, 添加:
1
2
3
4
5
6
7
8
9
10
11
12public boolean addUser(User user) {
boolean isSuccess = false;
try {
isSuccess = userList.add(user); // add user may fail when connect to database
} catch (Exception e) {
System.err.println("Fail to add user..");
}
return isSuccess;
} - 在 UserController.java, 添加:
1
2
3
4
5@RequestMapping(method=RequestMethod.POST, value="/users")
public boolean addUser(@RequestBody User user) { // transfer RequestBody to User instance
boolean isSuccess = userService.addUser(user);
return isSuccess;
}@RequestMapping(method=RequestMethod.POST, value="/users")@RequestBody User user
- 对于前端来说:
- 同样是
http://localhost:8080/users/,此时采用的是 POST 方法 - POST 的同时需要将添加的信息,以 JSON 的格式传递到 Controller
- Controller 再用
@RequestBody User user传递给 Service - Service 添加成功,返回一个 True。
- 同样是
- 运行程序,用 PostMan 来测试。
打开 PostMan:
- 选择 POST 作为方法,URL=http://localhost:8080/users/
- Headers:
- Key: Content-Type
- Value: application/json
- Body:
- raw
- JSON (application/json)
如图: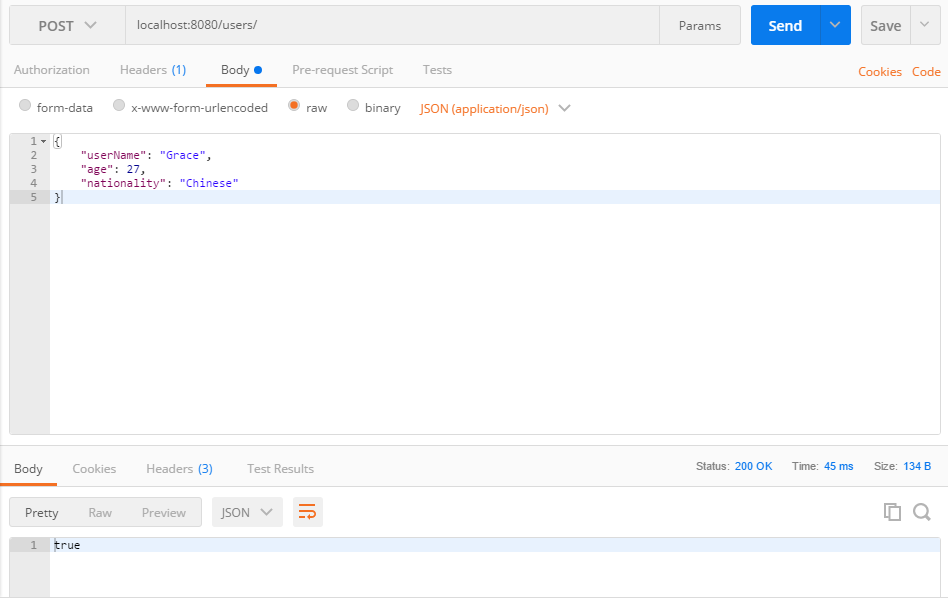
返回的结果得到 true。
前往 http://localhost:8080/users 得到: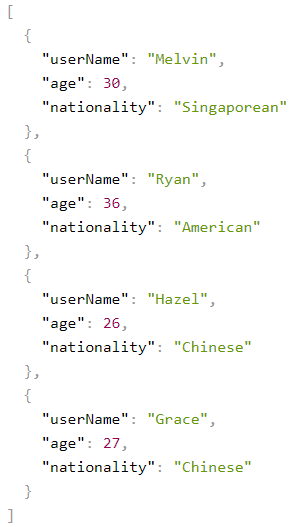
PUT 更新某个
- 在 UserService.java, 添加:
1
2
3
4
5
6
7
8
9
10
11
12
13
14
15
16
17
18public boolean updateUserByName(User updatedUser, String name) {
boolean isSuccess = false;
// get user with request name and replace it
for (User currentUser : userList) {
if (currentUser.getUserName().equals(name)) {
int index = userList.indexOf(currentUser);
userList.set(index, updatedUser);
isSuccess = true;
}
}
if (!isSuccess) {
System.err.println("There is no user called " + name);
}
return isSuccess;
} - 在 UserController.java, 添加:
1
2
3
4
5@RequestMapping(method=RequestMethod.PUT, value="/users/{name}")
public boolean updateUserByName(@RequestBody User user, @PathVariable String name) {
boolean isSuccess = userService.updateUserByName(user, name);
return isSuccess;
}@RequestMapping(method=RequestMethod.PUT, value="/users/{name}")@RequestBody User user, @PathVariable String name
- 用 name 来选中某个用户,用 user 来更新信息。 成功,返回 true。
- 运行程序,用 PostMan 来测试。
打开 PostMan:
- 选择 PUT 作为方法, URL = http://localhost:8080/users/Melvin
- Headers:
- Key: Content-Type
- Value: application/json
- Body:
- raw
- JSON (application/json)
如图: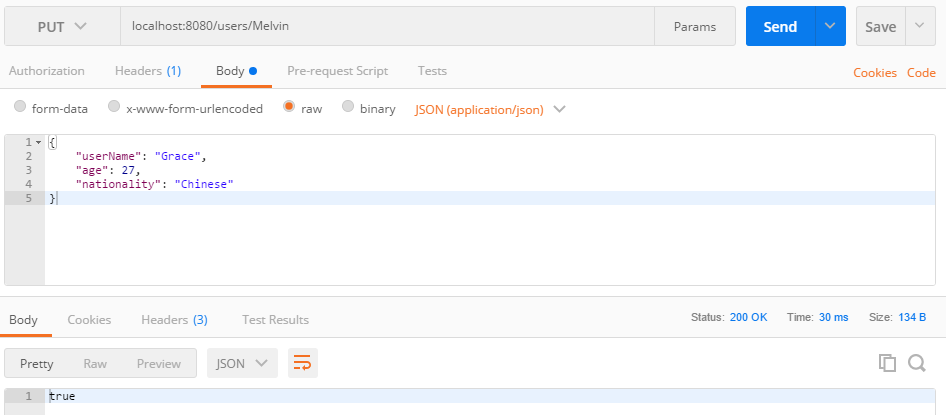
返回的结果得到 true。
前往 http://localhost:8080/users 得到: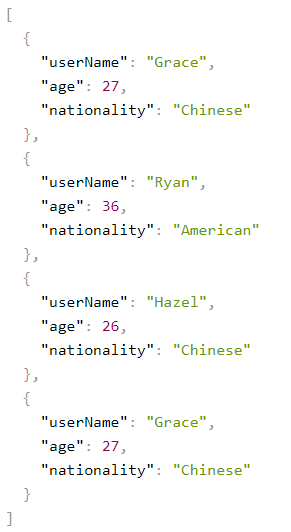
Melvin 的信息已经被替换掉了。
DELETE 删除某个
- 在 UserService.java, 添加:
1
2
3
4
5
6
7
8
9
10
11
12
13public boolean removeUserByName(String name) {
boolean isSuccess = false;
try {
isSuccess = userList.removeIf(user -> user.getUserName().equals(name));
if (!isSuccess) {
System.err.println("There is no user called " + name);
}
} catch (Exception e) {
System.err.println("Fail to remove user called " + name);
}
return isSuccess;
} - 在 UserController.java, 添加:
1
2
3
4
5@RequestMapping(method=RequestMethod.DELETE, value="/users/{name}")
public boolean removeUserByName(@PathVariable String name) {
boolean isSuccess = userService.removeUserByName(name);
return isSuccess;
} - 用 name 来选中某个用户,删除成功,返回 true。
- 运行程序,用 PostMan 来测试。
打开 PostMan:
- 选择 DELETE 作为方法, URL = http://localhost:8080/users/Grace
- 前往 http://localhost:8080/users 验证结果。
Web Application Layer
HTML(view)
controller.js
service.js
===============
Controller.java
Service.java
Repository.java
===============
BD-table
** 继续学习 -> 学习 Spring Boot**