学习 Spring Boot - 2
声明:本文为 ryanluoxu 原创文章,欢迎转载,请在明显位置注明出处。
在《学习 Spring Boot - 1》里,用 Service 虚拟了用户的数据。 这篇博客接着上一篇往下,介绍如何接入 PostgreSQL 数据库。
通常连接数据库,从 Service 层开始,要经过 DAO,DAO 里面需要调用已经完成 JDBC 连接设定的 DBUtil,创建了 connection 之后,通过执行 query 来传递数据。在 SpringBoot 里面,这一部分内容被预设在 Spring Data JPA 里面,通过调用 CrudRepository 即可。思路如下:
1 | Rest Client --> RestController | Service | Repository --> PostgreSQL (DBName=Demo; Table=users) |
根据这个思路,需要修改或者添加:
- SpringBoot 的设定
- 创建 PostgreSQL 数据库
- 修改 User 类
- 创建 UserRepository 接口
- 修改 UserService 类
SpringBoot 的设定
pom.xml
添加 Dependency
- Spring Data JPA
- PostgreSQL
1 | <dependency> |
application.properties (in src/main/resources)
添加:
1 | spring.datasource.url=jdbc:postgresql://<Host>/<DBName> |
例如:
1 | spring.datasource.url=jdbc:postgresql://postgresql.cfqvncjculpj.ap-southeast-1.rds.amazonaws.com:5432/Demo |
创建 PostgreSQL 数据库
安装连接 PostgreSQL 数据库
具体参考-> Database - PostgreSQL on AWS
创建表格
1 | CREATE TABLE users ( |
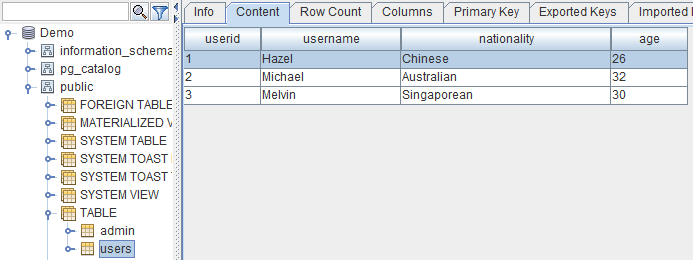
输入数据
1 | INSERT INTO users (userName, nationality, age) VALUES |
效果如下:
修改 User 类
DataModel Class: User.java
Before:
1 | public class User { |
After:
1 | @Entity |
@Entity标明这是一个与数据库对接的类@Table(name="users")里面定义了信息所在的表格implements Serializable@Id关键@Column(name="age")
创建 UserRepository 接口
- 创建 package: io.ryanluoxu.springboot.demo.repository
- 在下面创建接口类: UserRepository.java, 如下
1
2
3
public interface UserRepository extends CrudRepository<User, String>{
}
里面包括的方法:
- count()
- delete(T entity)
- deleteAll()
- deleteAll(Iterable<? extends T> entities)
- deleteById(ID id)
- existsById(ID id)
- findAll()
- findAllById(Iterable
ids) - findById(ID id)
- save(S entity)
- saveAll(Iterable
entities)
此处 Id 对应 User 类中的 @Id。
如果需要对 Id 以外的进行搜索,可以仅仅创建 Abstract Method:
1 | public ArrayList<User> findByNationality(String nationality); |
不需要 Implement 类。
修改 UserService 类
UserService.java
- 删去模拟数据的 Constructor
- 将 ArrayList 换成 UserRepository
- 修改调用方法
具体如下:1
2
3
4
5
6
7
8
9
10
11
12
13
14
15
16
17
18
19
20
21
22
23
24
25
26
27
28
29
30
31
32
33
34
35
36
37
38
39
40
41
42
43
44
45
46@Service
public class UserService {
@Autowired
UserRepository userRepository;
public ArrayList<User> getUserList(){
return (ArrayList<User>) userRepository.findAll();
}
public User getUserByName(String name) {
return userRepository.findOne(name);
}
public boolean addUser(User user) {
User u = userRepository.save(user);
if (u != null) {
return true;
} else {
System.err.println("Fail to add - " + user.getUserName());
return false;
}
}
public boolean updateUserByName(User updatedUser, String name) {
// Spring will take userName from updatedUser
// if userName exists, update; if not, add new user
User u = userRepository.save(updatedUser);
if (u != null) {
return true;
} else {
System.err.println("Fail to update - " + updatedUser.getUserName());
return false;
}
}
public boolean removeUserByName(String name) {
try {
userRepository.delete(name);
return true;
} catch (Exception e) {
System.err.println("Fail to remove user called " + name);
return false;
}
}
}
Save() 同时用于更新和添加
- 测试1
PUT - localhost:8080/users/Melvin结果添加了新的用户,而没有更改 Melvin 的信息。1
2
3
4
5{
"userName": "Grace",
"age": 26,
"nationality": "Chinese"
} - 测试2
POST - localhost:8080/users/结果Michael的信息被更改,而并没有添加新的用户。1
2
3
4
5{
"userName": "Michael",
"age": 27,
"nationality": "Chinese"
}
这里,添加新的用户和更新用户,用的同一个方法-save(User user)。
区别在于定义 User 时的 @id,以及 CrudRepository<User, String>,都指明了这组数据的 Primary Key。
**所以,Primary Key 不同,即为添加用户。相同,则为更新用户。 **
更新 UserService.java
1 | public boolean addUser(User user) { |
** 继续学习 -> 学习 Spring Boot**
=====
Maven to build it as jar
java -jar to run it
actuator
-> / health
managerment.port=
application.properties
Common application properties